In WPF application you can easily capture screen of your WPF window. In this article, I will show you how to take screenshot of full content of window.
Sometimes you need to capture all content of your window in
WPF application as screenshot. You can do it via Window screen capture (using Print
Screen button) but your application has large content and has scrollbar so the
content is not visible and not captured via Windows print screen. In such
scenario you can use below sample code to capture WPF window with full content.
See below code snippet.
XAML
<Window x:Class="ScreenCaptureDemo.MainWindow"
xmlns="http://schemas.microsoft.com/winfx/2006/xaml/presentation"
xmlns:x="http://schemas.microsoft.com/winfx/2006/xaml"
xmlns:d="http://schemas.microsoft.com/expression/blend/2008"
xmlns:mc="http://schemas.openxmlformats.org/markup-compatibility/2006"
xmlns:local="clr-namespace:ScreenCaptureDemo"
mc:Ignorable="d"
Title="MainWindow" Height="350"
Width="525">
<ScrollViewer Name="scrollViewer">
<Grid>
<Grid.RowDefinitions>
<RowDefinition Height="50" />
<RowDefinition Height="450"/>
<RowDefinition Height="50" />
</Grid.RowDefinitions>
<Grid.ColumnDefinitions>
<ColumnDefinition />
</Grid.ColumnDefinitions>
<Button
Content="Capture
Screen"
Grid.Row="1"
HorizontalAlignment="Center"
Width="150" Height="50" Click="Button_Click" />
<TextBlock
Text="Top Left
Content"
Grid.Row="0"
HorizontalAlignment="Left"></TextBlock>
<TextBlock
Text="Top Rigth
Content"
Grid.Row="0"
HorizontalAlignment="Right"></TextBlock>
<TextBlock
Text="Bottom Left
Content"
Grid.Row="2"
HorizontalAlignment="Left"></TextBlock>
<TextBlock
Text="Bottom Rigth
Content"
Grid.Row="2"
HorizontalAlignment="Right" ></TextBlock>
</Grid>
</ScrollViewer>
</Window>
Code
public partial class MainWindow : Window
{
public MainWindow()
{
InitializeComponent();
}
private void Button_Click(object sender, RoutedEventArgs e)
{
//Set scrollviewer's
Content property as UI element to capture full content
UIElement element =
scrollViewer.Content as UIElement;
Uri path = new Uri(@"d:\temp\screenshot.png");
CaptureScreen(element, path);
}
public void CaptureScreen(UIElement source, Uri destination)
{
try
{
double Height, renderHeight, Width, renderWidth;
Height = renderHeight = source.RenderSize.Height;
Width = renderWidth = source.RenderSize.Width;
//Specification for target bitmap like width/height pixel
etc.
RenderTargetBitmap renderTarget = new RenderTargetBitmap((int)renderWidth, (int)renderHeight, 96, 96, PixelFormats.Pbgra32);
//creates Visual Brush of UIElement
VisualBrush visualBrush = new
VisualBrush(source);
DrawingVisual drawingVisual = new
DrawingVisual();
using
(DrawingContext drawingContext =
drawingVisual.RenderOpen())
{
//draws image of element
drawingContext.DrawRectangle(visualBrush, null, new Rect(new Point(0, 0), new Point(Width, Height)));
}
//renders image
renderTarget.Render(drawingVisual);
//PNG encoder for creating PNG file
PngBitmapEncoder encoder = new PngBitmapEncoder();
encoder.Frames.Add(BitmapFrame.Create(renderTarget));
using
(FileStream stream = new FileStream(destination.LocalPath, FileMode.Create, FileAccess.Write))
{
encoder.Save(stream);
}
}
catch (Exception e)
{
MessageBox.Show(e.ToString());
}
}
}
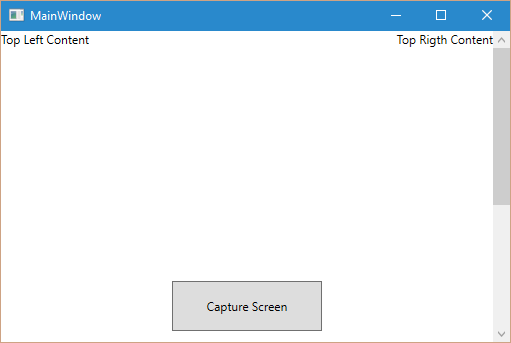
Output –
Generated PNG File –

As you can see in above example, MainWindow has a scrollbar
and has some more content which is not visible currently on window. When you click on Capture Screen
button it will capture full content of MainWindow and shows full content in
generated file as per above image.
I hope you liked this article. Please leave your feedback in
comments below.
See Also –
