Showing posts with label VisualBrush. Show all posts

Wednesday, July 27, 2016

How to capture screenshot of WPF application?


In WPF application you can easily capture screen of your WPF window. In this article, I will show you how to take screenshot of full content of window.

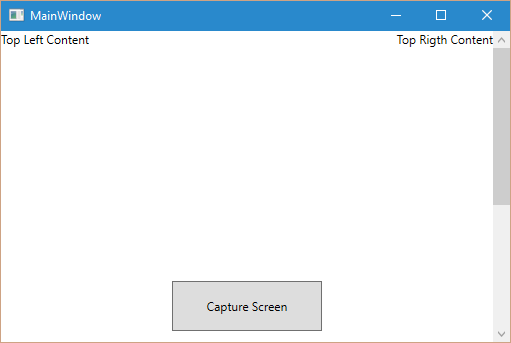
Sometimes you need to capture all content of your window in WPF application as screenshot. You can do it via Window screen capture (using Print Screen button) but your application has large content and has scrollbar so the content is not visible and not captured via Windows print screen. In such scenario you can use below sample code to capture WPF window with full content. See below code snippet.

XAML
<Window x:Class="ScreenCaptureDemo.MainWindow"
        xmlns="http://schemas.microsoft.com/winfx/2006/xaml/presentation"
        xmlns:x="http://schemas.microsoft.com/winfx/2006/xaml"
        xmlns:d="http://schemas.microsoft.com/expression/blend/2008"
        xmlns:mc="http://schemas.openxmlformats.org/markup-compatibility/2006"
        xmlns:local="clr-namespace:ScreenCaptureDemo"
        mc:Ignorable="d"
        Title="MainWindow" Height="350" Width="525">
    <ScrollViewer Name="scrollViewer">
        <Grid>
            <Grid.RowDefinitions>
                <RowDefinition Height="50" />
                <RowDefinition Height="450"/>
                <RowDefinition Height="50" />
            </Grid.RowDefinitions>
            <Grid.ColumnDefinitions>
                <ColumnDefinition />
            </Grid.ColumnDefinitions>
            <Button Content="Capture Screen"
                Grid.Row="1"
                HorizontalAlignment="Center"
                Width="150" Height="50" Click="Button_Click"  />
            <TextBlock Text="Top Left Content"
                   Grid.Row="0"
                   HorizontalAlignment="Left"></TextBlock>
            <TextBlock Text="Top Rigth Content"
                   Grid.Row="0"
                   HorizontalAlignment="Right"></TextBlock>
            <TextBlock Text="Bottom Left Content"
                   Grid.Row="2"
                   HorizontalAlignment="Left"></TextBlock>
            <TextBlock Text="Bottom Rigth Content"
                   Grid.Row="2"
                   HorizontalAlignment="Right" ></TextBlock>
        </Grid>
    </ScrollViewer>
</Window>

Code
public partial class MainWindow : Window
{
    public MainWindow()
    {
        InitializeComponent();
    }

    private void Button_Click(object sender, RoutedEventArgs e)
    {
        //Set scrollviewer's Content property as UI element to capture full content
        UIElement element = scrollViewer.Content as UIElement;
        Uri path = new Uri(@"d:\temp\screenshot.png");
        CaptureScreen(element, path);
    }
    public void CaptureScreen(UIElement source, Uri destination)
    {
        try
        {
            double Height, renderHeight, Width, renderWidth;

            Height =  renderHeight = source.RenderSize.Height;
            Width =  renderWidth = source.RenderSize.Width;

            //Specification for target bitmap like width/height pixel etc.
            RenderTargetBitmap renderTarget = new RenderTargetBitmap((int)renderWidth, (int)renderHeight, 96, 96, PixelFormats.Pbgra32);
            //creates Visual Brush of UIElement
            VisualBrush visualBrush = new VisualBrush(source);

            DrawingVisual drawingVisual = new DrawingVisual();
            using (DrawingContext drawingContext = drawingVisual.RenderOpen())
            {
                //draws image of element
                drawingContext.DrawRectangle(visualBrush, null, new Rect(new Point(0, 0), new Point(Width, Height)));
            }
            //renders image
            renderTarget.Render(drawingVisual);

            //PNG encoder for creating PNG file
            PngBitmapEncoder encoder = new PngBitmapEncoder();
            encoder.Frames.Add(BitmapFrame.Create(renderTarget));
            using (FileStream stream = new FileStream(destination.LocalPath, FileMode.Create, FileAccess.Write))
            {
                encoder.Save(stream);
            }
        }
        catch (Exception e)
        {
            MessageBox.Show(e.ToString());
        }
    }
}

Output –

Generated PNG File –


As you can see in above example, MainWindow has a scrollbar and has some more content which is not visible currently on window. When you click on Capture Screen button it will capture full content of MainWindow and shows full content in generated file as per above image.

I hope you liked this article. Please leave your feedback in comments below.

See Also –

Tuesday, October 4, 2011

WPF Brushes


Brushes are used to fill area with color or graphics. Brushes can be used to fill background, foreground and border color of an element. Brush classes are available in System.Windows.Media namespace. In this post I will demonstrate frequently used brushes in WPF. Below are the list of most used brushes available in WPF.

List of brush classes
  • SolidColorBrush
  • LinearGradientBrush
  • RadialGradientBrush
  • ImageBrush
  • VisualBrush
  • BitmapCacheBrush

Let’s understand all the brushes with simple example.

<StackPanel>
<WrapPanel Margin="10">
<StackPanel>
    <Label Content="Solid Color Brush" Margin="5" />
    <Rectangle Height="100" Width="100" Margin="10">
        <Rectangle.Fill>
            <SolidColorBrush Color="Blue" />
        </Rectangle.Fill>
    </Rectangle>
</StackPanel>
<StackPanel>
    <Label Content="Linear Gradient Brush" Margin="5" />
    <Rectangle Height="100" Width="100" Margin="10">
        <Rectangle.Fill>
            <LinearGradientBrush >
                <GradientStop Color="Blue" Offset="0"/>
                <GradientStop Color="Cyan" Offset="0.4"/>
                <GradientStop Color="Red" Offset="1" />
            </LinearGradientBrush>
        </Rectangle.Fill>
    </Rectangle>
</StackPanel>
<StackPanel>
    <Label Content="Radia Gradient Brush" Margin="5" />
    <Rectangle Height="100" Width="100" Margin="10">
        <Rectangle.Fill>
            <RadialGradientBrush >
                <GradientStop Color="Blue" Offset="0"/>
                <GradientStop Color="Cyan" Offset="0.7" />
                <GradientStop Color="LightBlue" Offset="1" />
            </RadialGradientBrush>
        </Rectangle.Fill>
    </Rectangle>
</StackPanel>
</WrapPanel>
<WrapPanel Margin="10">
<StackPanel>
    <Label Content="Image Brush" Margin="5" />
    <Rectangle Height="100" Width="150" Margin="10">
        <Rectangle.Fill>
            <ImageBrush  ImageSource="Images\Desert.jpg"
                         Opacity="0.7" />
        </Rectangle.Fill>
    </Rectangle>
</StackPanel>
<StackPanel>
    <Label Content="Image Brush with TileMode" Margin="5" />
    <Rectangle Height="100" Width="200" Margin="10">
        <Rectangle.Fill>
            <ImageBrush ImageSource="Images\Play.ico"
                        TileMode="Tile" Stretch="Fill" 
                        Viewport="0,0,0.2,0.4" />
        </Rectangle.Fill>
    </Rectangle>
</StackPanel>
</WrapPanel>
<WrapPanel Margin="5">
<StackPanel>
    <Label Content="Image Brush with TileMode" Margin="2" />
    <TextBlock Height="100" Width="350" Margin="2"
                Text="WPF Brush" FontSize="65"
                FontFamily="Arial Rounded MT" >
        <TextBlock.Foreground>
            <ImageBrush  ImageSource="Images\Desert.jpg"
                         TileMode="Tile" Stretch="Fill"
                         Viewport="0,0,0.2,0.4" />
        </TextBlock.Foreground>
    </TextBlock>
</StackPanel>
</WrapPanel>
</StackPanel>


As shown in above image and code, First row displays use of Solid color brush, linear gradient brush and radial gradient brush. In second row Image Brush is used and in last image of second row imagebrush is used with tile mode. In third row Tilemode is applied to foreground color of Textblock.

VisualBrush

Visual brush allows visual representation of brush to fill an element’s surface. For example, using Visual brush we can copy the appearance of button inside rectangle. It just copy and fill the look of button into rectangle. Let’s have a look on below example.

<StackPanel>
<Button Content="VisualBrush"
        Name="visualBrushButton"
        Height="40" Width="150"
        Margin="10"/>
<Border BorderBrush="Blue"
        Height="150" Width="200"
        BorderThickness="2">
    <Rectangle Height="100" Width="150"
            Margin="10">
        <Rectangle.Fill>
            <VisualBrush
Visual="{Binding ElementName=visualBrushButton}"
                     Stretch="Fill" TileMode="Tile"/>
        </Rectangle.Fill>
    </Rectangle>
</Border>
</StackPanel>


As per above example, the stack panel contains button and rectangle. Rectangle is filled with Visual Brush and Visual brush’s visual element is bound with button. So rectangle will fill with button. You can see the button is filled inside rectangle.

BitmapCacheBrush

Bitmap cache brush is similar to visual brush but bitmap cache brush stores visual content in video memory of video card. So using bitmap cache, the content will redraw quickly when needed. Bitmap cache is more suitable in scenarios when user interface is loaded with heavy animation and complex vector content so in that scenario it will use content from cache memory. Bitmap cache brush has some significant memory impact because it takes little time to store content inside video memory. To use bitmap cache you need to set BitmapCatch property of BitmapCacheBrush. Let’s have a look on below code snippet.

<Rectangle Height="100"
           Width="150" Margin="10">
    <Rectangle.Fill>
        <BitmapCacheBrush
    Target="{Binding ElementName=visualBrushButton}"
    BitmapCache="BitmapCache" />
    </Rectangle.Fill>
</Rectangle>

BitmapCacheBrush is almost similar to VisualBrush so I have modified above example of VisualBrush with BitmapCacheBrush. BitmapCacheBrush has target property which contains the element and BitmapCache property. The output would be the same as per VisualBrush example. The difference here is BitmapCacheBrush will cache the element in video memory.

Hope you liked this article. Please feel free to write comments and feedback in comment section of this post.

See also –