Showing posts with label Visual. Show all posts

Wednesday, July 27, 2016

How to capture screenshot of WPF application?


In WPF application you can easily capture screen of your WPF window. In this article, I will show you how to take screenshot of full content of window.

Sometimes you need to capture all content of your window in WPF application as screenshot. You can do it via Window screen capture (using Print Screen button) but your application has large content and has scrollbar so the content is not visible and not captured via Windows print screen. In such scenario you can use below sample code to capture WPF window with full content. See below code snippet.

XAML
<Window x:Class="ScreenCaptureDemo.MainWindow"
        xmlns="http://schemas.microsoft.com/winfx/2006/xaml/presentation"
        xmlns:x="http://schemas.microsoft.com/winfx/2006/xaml"
        xmlns:d="http://schemas.microsoft.com/expression/blend/2008"
        xmlns:mc="http://schemas.openxmlformats.org/markup-compatibility/2006"
        xmlns:local="clr-namespace:ScreenCaptureDemo"
        mc:Ignorable="d"
        Title="MainWindow" Height="350" Width="525">
    <ScrollViewer Name="scrollViewer">
        <Grid>
            <Grid.RowDefinitions>
                <RowDefinition Height="50" />
                <RowDefinition Height="450"/>
                <RowDefinition Height="50" />
            </Grid.RowDefinitions>
            <Grid.ColumnDefinitions>
                <ColumnDefinition />
            </Grid.ColumnDefinitions>
            <Button Content="Capture Screen"
                Grid.Row="1"
                HorizontalAlignment="Center"
                Width="150" Height="50" Click="Button_Click"  />
            <TextBlock Text="Top Left Content"
                   Grid.Row="0"
                   HorizontalAlignment="Left"></TextBlock>
            <TextBlock Text="Top Rigth Content"
                   Grid.Row="0"
                   HorizontalAlignment="Right"></TextBlock>
            <TextBlock Text="Bottom Left Content"
                   Grid.Row="2"
                   HorizontalAlignment="Left"></TextBlock>
            <TextBlock Text="Bottom Rigth Content"
                   Grid.Row="2"
                   HorizontalAlignment="Right" ></TextBlock>
        </Grid>
    </ScrollViewer>
</Window>

Code
public partial class MainWindow : Window
{
    public MainWindow()
    {
        InitializeComponent();
    }

    private void Button_Click(object sender, RoutedEventArgs e)
    {
        //Set scrollviewer's Content property as UI element to capture full content
        UIElement element = scrollViewer.Content as UIElement;
        Uri path = new Uri(@"d:\temp\screenshot.png");
        CaptureScreen(element, path);
    }
    public void CaptureScreen(UIElement source, Uri destination)
    {
        try
        {
            double Height, renderHeight, Width, renderWidth;

            Height =  renderHeight = source.RenderSize.Height;
            Width =  renderWidth = source.RenderSize.Width;

            //Specification for target bitmap like width/height pixel etc.
            RenderTargetBitmap renderTarget = new RenderTargetBitmap((int)renderWidth, (int)renderHeight, 96, 96, PixelFormats.Pbgra32);
            //creates Visual Brush of UIElement
            VisualBrush visualBrush = new VisualBrush(source);

            DrawingVisual drawingVisual = new DrawingVisual();
            using (DrawingContext drawingContext = drawingVisual.RenderOpen())
            {
                //draws image of element
                drawingContext.DrawRectangle(visualBrush, null, new Rect(new Point(0, 0), new Point(Width, Height)));
            }
            //renders image
            renderTarget.Render(drawingVisual);

            //PNG encoder for creating PNG file
            PngBitmapEncoder encoder = new PngBitmapEncoder();
            encoder.Frames.Add(BitmapFrame.Create(renderTarget));
            using (FileStream stream = new FileStream(destination.LocalPath, FileMode.Create, FileAccess.Write))
            {
                encoder.Save(stream);
            }
        }
        catch (Exception e)
        {
            MessageBox.Show(e.ToString());
        }
    }
}

Output –
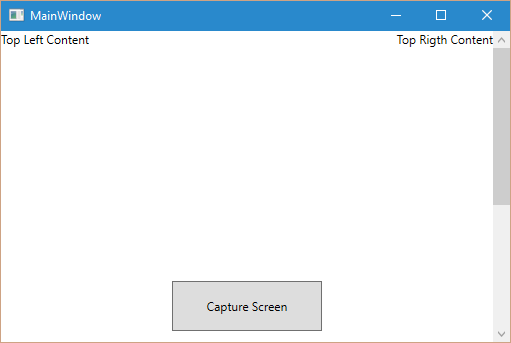

Generated PNG File –


As you can see in above example, MainWindow has a scrollbar and has some more content which is not visible currently on window. When you click on Capture Screen button it will capture full content of MainWindow and shows full content in generated file as per above image.

I hope you liked this article. Please leave your feedback in comments below.

See Also –

Friday, June 24, 2011

WPF Class Hierarchy

In this post I will explain in brief about WPF Class Hierarchy. 

Major UI Elements are contained in PresentationFramewok assembly of Managed WPF layer. You can read more about WPF Architecture here. It is helpful to take a look at WPF class hierarchy to get more clear idea about WPF controls. Below diagram contains core and fundamental classes of WPF.     


Dispatcher Object
WPF uses single threaded model it means entire UI is owned by single thread. So you can’t access UI Elements from another thread. To overcome with this situations WPF introduced dispatcher. Almost all UI Elements are derived from DispatcherObject class. This class contains two methods CheckAccess and VerifyAccess. CheckAccess method returns true if calling thread has access to this object and VerifyAccess throws an exception if calling thread does not have access to that object. So using this simple functionality all WPF objects are being able to determine that they only used by UI Thread.

Dependency Object
Dependency Object is the base class that supports Dependency Property and Attached Property. The Dependency Properties are used in Data Binding. You can create your own Dependency Property by deriving Dependency Object to you own class. Dependency Object has two Major methods GetValue and SetValue. GetValue method used to get value from Dependency Property and SetValue method used to set value to Dependency Property. I will explain more about data binding in my future posts.

Visual
Each and every element that has visual representation and appears in WPF Window is derived from Visual class. Visual class provides some basic Drawing functionality to encapsulate drawing instructions also some drawing related information like clipping, opacity etc. It also has some basic methods to add and remove visuals. Visual class also provides link between managed libraries and milcore.dll that renders display. You can read more about milcore.dll here.

UI Element
UI Element added support for Layout, Focus, Input, Event, command bindings etc. These are core and essential features of WPF. At UI element level basic layout is introduced – Measure and Arrange passes. Measure allows determining that how much size it would take and Arrange allows a parent to determine final size of each child. UI Element also introduce notation of command binding.

Framework Element
Framework element extends layout features of UI Element and adds support for features like data binding, animation and styles. It also supports key properties like HorizontalAlignment, VerticalAlignment, and Margin etc. 

Control
Control is base class for almost all controls available in WPF such as Button, StatusBar, Combobox, Label etc. At this level many control level properties introduced like background, foreground and Font related properties like FontSize, FontStyle, FontWeight etc.


You can read about WPF Architecture  here.